There are two important reasons why you should handle this information with care and take the 20 minutes max that it takes to get the Google Tag Manager implemented:
- We need the information we get from our tracking methods in order for our technology to be as successful as possible;
- We want to create the ideal candidate journey for your candidates.
To make sure we can do that, it is highly important that we can install tracking pixels on your (careers) page.
Note: this is a technical action which requires access to the code of your website. Please reach out to the person responsible for your career page.
For your and our ease, we have chosen to make use of the Google Tag Manager. You can see this as a tray, in which we place all pixels we need for correct use of our tooling.
Why is using the Google Tag Manager easy?
You only have to implement it once, using a single piece of code. This saves a lot of emails back and forth and also a lot of (valuable) development resources.
Can you tell me more about the Google Tag Manager?
In the event that the information above is not accurate enough or you want to have more in-depth information on the GTM, we would like to refer you to our Partners over at Google.

Implementing the Google Tag Manager
The now following information is rather technical. If you do not feel comfortable or are not able to follow the steps, we would suggest that you send this page to a more technical person within your company.
Measuring conversions
In the case we are running campaigns with the objective to generate applicants, we need to make sure we can track those applies. In the marketing world, those are called conversions.
Every career site is (slightly) different, so this requires custom work. During your onboarding, our technical onboarding specialist will be in contact with you. There are three options;
- Wonderkind is able to place a Google Tag Manager on your site. In this case, you can go to the 'We do not have a Google Tag Manager on our website' section of this.
- If you already have Google Tag Manager on your career site, our technical onboarding specialist will request publishing permission for your Google Tag Manager. He will implement the required tag and the correct triggers.
- If both of the above are not an option, we will create the correct Google Tag Manager container on our end and will send you a JSON export. In that case, please go to the 'We already have a Google Tag Manager on our website, but can't give you access' section.
💡Pro tip: In the event that you already have a Google Tag Manager on your website, please scroll down.
We do not have a Google Tag Manager on our website
We will provide you with the correct pieces of code to implement in the <head> and <body> of your website. Paste this piece of code in the <head> of your website:
If you need more guidance, please see this Quickstart Guide by Google. Make sure this code is present on all pages.
We already have a Google Tag Manager on our website, but can't give you access
- Download the .json file you received from the technical onboarding specialist or Partner Success Manager.
After that, follow these easy steps:
- In the top navigation, click “Admin”.
- In the container section, click “Import Container”.
- Click “Choose Container File” and select the file that you would like to import.
- Select a new workspace.
- To add the file to a new workspace:
- Under “Choose workspace”, click “New.”
- Enter a title and description for your workspace.
- Click “Save”.
- Select “Merge” as import option.
- To merge, you need to rename conflicting variables, triggers and tags.
- Rename conflicting tags, triggers, and variables: if a variable, tag, or trigger in the new container has the same name but the contents are different, rename the new one. (If the contents are the same, there is no conflict.)
- Click “Continue”. The preview dialog shows how many tags, triggers and variables will be added, modified, or deleted. Click “View Detailed Changes” to see a list of all the items that will be affected.
- Once you are satisfied with the changes that will be made, click “Confirm”.
- Click on the blue button “submit” to review your changes.
- Publish the container to your website.
Verify your domain
As the last step, verify your website's domain to help avoid any future disruption of your Talent Attraction Campaigns. Below you can find the steps on how to complete the process.
Step 1.
Go to Meta Business Suite and select 'Settings'. Then, select 'More Business Settings'.
.png?width=295&name=Group%2011%20(1).png) Step 2.
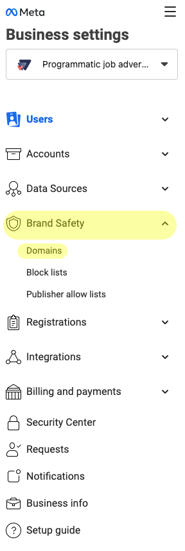
Step 2.
Select 'Brand Safety' from the menu on the left side and select 'Domains'. If you cannot find the Brand Safety tab, please check your rights with your admin.
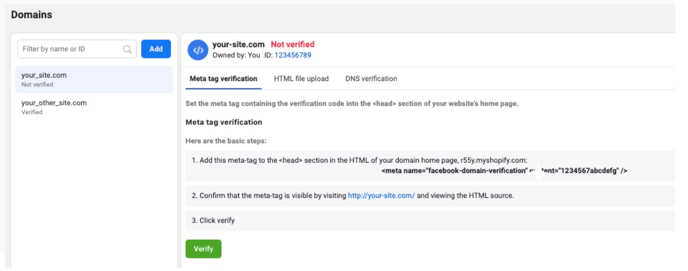
Step 3.
Click on your domain and choose which verification type you would wish to use. You can verify your domain by DNS, HTML, or by Meta Tag. After that, follow the instructions given by Meta.
Now you're all set for your Wonderkind campaign. Easy, wasn't it?
Did this answer your question?